
Sunday, January 12, 2014
Neighborhood Christmas Gift: Diet Coke and Mentos
We have some awesome (and creative) neighbors. I just HAD to post a photo of one of the Christmas gifts we got. It was so very clever. It came with a note that said, "We think you 'geyser' awesome."

Neighborhood Christmas Gift: Ice Melt
Right before Christmas, we got some REALLY cold, snowy weather. Here's what we gave to our neighbors:


Thursday, December 26, 2013
Bedroom Dresser Re-do
I found this beauty for free on Craig's List. My nephews helped me haul it from the seller's home to my home for the price of lunch. Win-win for me!

 I used Citristrip stripping gel to take off the orange-ish hue. Then I used Minwax gel stain to finish the piece.


Sunday, December 15, 2013

Friday, December 13, 2013
Pajama Pocket Tutorial
Every year, I sew pajama bottoms for our kids as a Christmas Eve gift. I use fabric that has something to do with an interest or a hobby they've had that year. Can you tell what interest 12-year-old Essie has had?

She has memorized the lyrics and dance from this catchy video. Find the answer to "What does the fox say?" here.
Also every year, my sister calls me from out-of-state to ask how to sew pajama pockets. It's tough to remember how to sew pockets when you only do it once a year. While I LOVE talking to my sister, it's kinda hard to explain how to sew a pocket over the phone. So Karen, this is for you:
Step 1: When cutting your fabric, cut four pocket pieces.

Step 2: After sewing the inseams and the crotch, pin each pocket piece to the pajama pant, right sides together about 3 inches down from the waist edge. All four panels (2 front panels, 2 back panels) should have one pocket piece pinned to it. In this photo, the waistband is on the left.

Step 3: Sew a straight line from the top of the pocket to the bottom of the pocket, parallel to the outseam of the pajamas, using a 1/4 inch seam allowance. In this photo, the waistband is at the top.

Step 4: Separate the pocket piece from the pant and iron the pocket toward the pant.

Step 5: Now place right sides together for the entire pajama pant. It should look like inside-out pajamas.

Step 6: Pin the entire outseam (I know inseam is a word--is outseam a word too?) together. You don't need to pin the top of the pocket. That part won't be sewn, but will be taken up when you sew the waistband.

Step 7: Sew a straight line from the waistband to about 3/4 inch past the top of the pocket. Use a 5/8 inch seam allowance. In this photo the waistband is on the left.

Step 8: Now sew one continuous seam from the top of the pocket to the hem of the pant.

The bottom of the pocket should look like this:

Step 9: Cut a small slit under the pocket flap.

Step 10: Fold the waistband over to include the top of the pocket. Pin the pocket facing the front of the pant (you don't want backwards pockets!) Sew the top of the pocket into the waistband.

Finish the pajama hem and waistband. Voila!
You can call me anyways, Karen.
She has memorized the lyrics and dance from this catchy video. Find the answer to "What does the fox say?" here.
Also every year, my sister calls me from out-of-state to ask how to sew pajama pockets. It's tough to remember how to sew pockets when you only do it once a year. While I LOVE talking to my sister, it's kinda hard to explain how to sew a pocket over the phone. So Karen, this is for you:
Step 1: When cutting your fabric, cut four pocket pieces.
Step 2: After sewing the inseams and the crotch, pin each pocket piece to the pajama pant, right sides together about 3 inches down from the waist edge. All four panels (2 front panels, 2 back panels) should have one pocket piece pinned to it. In this photo, the waistband is on the left.
Step 3: Sew a straight line from the top of the pocket to the bottom of the pocket, parallel to the outseam of the pajamas, using a 1/4 inch seam allowance. In this photo, the waistband is at the top.
Step 4: Separate the pocket piece from the pant and iron the pocket toward the pant.
Step 5: Now place right sides together for the entire pajama pant. It should look like inside-out pajamas.
Step 6: Pin the entire outseam (I know inseam is a word--is outseam a word too?) together. You don't need to pin the top of the pocket. That part won't be sewn, but will be taken up when you sew the waistband.
Step 7: Sew a straight line from the waistband to about 3/4 inch past the top of the pocket. Use a 5/8 inch seam allowance. In this photo the waistband is on the left.
Step 8: Now sew one continuous seam from the top of the pocket to the hem of the pant.
The bottom of the pocket should look like this:
Step 9: Cut a small slit under the pocket flap.
Step 10: Fold the waistband over to include the top of the pocket. Pin the pocket facing the front of the pant (you don't want backwards pockets!) Sew the top of the pocket into the waistband.
Finish the pajama hem and waistband. Voila!
You can call me anyways, Karen.
Thursday, December 5, 2013
Painted Kitchen Table
For a long time I've known I wanted to change my kitchen table. Our old table was perfect for our last home, but I felt this space called for a round table.
 Knowing that I could not spend a fortune on a brand-spankin' new table, I began to search the local classifieds. I needed a table that would comfortably seat 5 people, so I had to find a round table that was 58-60 inches. I looked every day for two months--sometimes even twice a day! My searching paid off when I found this beauty for $10!!! It also just happened to belong to a man who lived about three miles from me.


 I took it down to the basement and washed it down with dish soap and water, which removes the grease. Side note: this is my favorite part of the process. It allows me to see every small detail of the piece. It made me fall more and more in love with this table!
My supplies:
 I let it sit for a day, then applied the first coat of Annie Sloan's Old White chalk paint. Since reading other blogs about this paint, I knew I wanted to try it. This paint does not require stripping the furniture first. In fact, the top of this table was pretty stripped, but the legs were not. Annie Sloan's paint worked best on the legs, as it seemed to soak into the top.
 I used a natural bristle brush (purchased at Walmart for about $2). I bought two bristle brushes, but ended up just using one. I applied two coats of paint. You will have to pick bristles and small paint clumps out of the paint as you go.
I let the paint dry overnight, then applied a thin coat of Annie Sloan's clear wax. I tried to apply this wax with a round wax brush, but found that the clear wax was easiest to apply with a clean, lint-free rag (I used an old bandana). After letting that sit for a day (although it wasn't totally dry), I lightly sanded the edges of the table, then immediately applied a thin coat of Annie Sloan's dark wax.
This is where I goofed. Because it was easier to use a cloth to apply the clear wax, I assumed the same would be true for the dark wax. Not so. As I applied the dark wax with the cloth, it looked splotchy. I knew once the table was finished it would just look dirty to me, so the entire table top got sanded down to the wood grain, re-painted (two coats), lightly sanded the edges, then applied the dark waxed using the round bristle brush. I lightly dipped the brush into the wax, then rubbed it on paper, before rubbing it onto the table.


I especially loved how the dark wax brought out the cracks in the table.

Here is the after picture. We love our new table!


My supplies:


I let the paint dry overnight, then applied a thin coat of Annie Sloan's clear wax. I tried to apply this wax with a round wax brush, but found that the clear wax was easiest to apply with a clean, lint-free rag (I used an old bandana). After letting that sit for a day (although it wasn't totally dry), I lightly sanded the edges of the table, then immediately applied a thin coat of Annie Sloan's dark wax.
This is where I goofed. Because it was easier to use a cloth to apply the clear wax, I assumed the same would be true for the dark wax. Not so. As I applied the dark wax with the cloth, it looked splotchy. I knew once the table was finished it would just look dirty to me, so the entire table top got sanded down to the wood grain, re-painted (two coats), lightly sanded the edges, then applied the dark waxed using the round bristle brush. I lightly dipped the brush into the wax, then rubbed it on paper, before rubbing it onto the table.


I especially loved how the dark wax brought out the cracks in the table.

Here is the after picture. We love our new table!

Saturday, January 19, 2013
Lego Party
I helped my friend with a party for her son. I loved the theme she chose: LEGOS! Here's what I came up with.
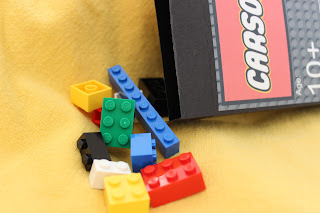
The invitation was a box of Legos. I made the box out of black cardstock, then I was able to put real Legos into it.

Going with the theme of "Come Build a Birthday Party" my friend served Build-Your-Own Nacho and Taco bar and for dessert Build-Your-Own-Sundae (Carson doesn't like cake).
When the kids came through the door they guessed the number of Legos in a jar (343!). Then they assembled car kits which I purchased from ebay--old Happy Meal toys. They raced the cars a few times.
The next game was a Minute-To-Win-It type of game. The kids had to stack Legos as high as possible in one minute.
The last game was also a timed, quick moving game. Each child had two plates placed before him. One plate had a few Legos on it, the other was empty. At the "go" signal, each child had to transfer all the Legos from one plate to the other using just a straw, no hands.
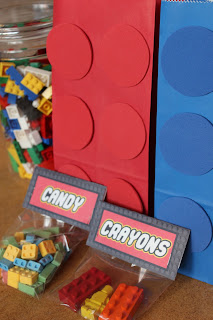
The take-home bags were made by cutting out foam circles and taping them onto a plain goodie bag. Inside the bags were: 1. homemade crayons 2. Lego candy and 3. a small Lego kit. The boys were also able to take home their race car.
The invitation was a box of Legos. I made the box out of black cardstock, then I was able to put real Legos into it.


Going with the theme of "Come Build a Birthday Party" my friend served Build-Your-Own Nacho and Taco bar and for dessert Build-Your-Own-Sundae (Carson doesn't like cake).
When the kids came through the door they guessed the number of Legos in a jar (343!). Then they assembled car kits which I purchased from ebay--old Happy Meal toys. They raced the cars a few times.
The next game was a Minute-To-Win-It type of game. The kids had to stack Legos as high as possible in one minute.
The last game was also a timed, quick moving game. Each child had two plates placed before him. One plate had a few Legos on it, the other was empty. At the "go" signal, each child had to transfer all the Legos from one plate to the other using just a straw, no hands.
The take-home bags were made by cutting out foam circles and taping them onto a plain goodie bag. Inside the bags were: 1. homemade crayons 2. Lego candy and 3. a small Lego kit. The boys were also able to take home their race car.

Subscribe to:
Posts (Atom)